Αναζήτηση

Powered By Blogger

Feb 7, 2013

Building an automatic bicycle transmission in a week

Building an automatic bicycle transmission in a week:
1
Every year, the ECE department of Carnigie Mellon University hosts Build18, an engineering festival intended to get students out of the classroom and into the workshop. [Andrew Toth] along with team members [Jenna MacCarley], [Peter McHale], and [Nicolas Mellis] have been busy this last week putting together an automatic bicycle transmission.
Most cyclists agree that a cadence of 80 RPM is just about right for most cycling. The team’s transmission uses Hall effect sensors to sense the cadence of the rider and will change to a higher gear if the cadence drops below 60 RPM and a lower gear if the cadence is above 100 RPM.
One of the requirements of the Build18 festival is the completed project must cost less than $250. By using an Arduino Mega and a servo to change gears, the team has a fairly low cost solution to automatically changing bicycle gears.
It’s a very cool project, and hopefully we’ll see a video once the competition is over at noon, EST today.

Filed under: contests, transportation hacks

Building a tool to bend small metal tubes

Building a tool to bend small metal tubes:
tube
[Joel] is setting up a really nice workshop. Included in his list of machinery are the staples of any workshop; a lathe, miter saw, containers full of organized screws, and a manual mill converted to a CNC machine. [Joel] wanted an oiling system for his mill, and like any good maker decided to fabricate his own. This required bending very small diameter brass tubes, something doable by hand (or without sand, at least). He decided to solve this problem with a DIY tube bending tool that allows him to bend tiny brass tubing without the walls collapsing.
[Joel] broke out his lathe and machined two brass rollers with a groove to hold his 3/16″ tubing. One of these brass rollers is attached to a handle, while the other is attached to a block that gets clamped into [Joel]‘s bench vise. After threading some tubing through the rollers, [Joel] is able to bend it precisely with only a tiny bit of collapsing on small-radius bends.

Filed under: tool hacks

Feedback for automated water and food pet dispensers

Feedback for automated water and food pet dispensers:
pet-food-and-water-automation
[Enrico] figured out a way to fully automate his pet food and water. The system is in two parts, the water trough as seen on the left, and the food dispenser whose control hardware is shown on the right. The system is even hooked up to the network so that he can make sure it didn’t break down while he was away.
The water dispenser uses parts from a sprinkler system. Since it’s mounted outdoors it doesn’t matter if the water overflows a little bit. So [Enrico] set up the timer to run the water for three minutes every day. This acts as a backup system since the trough already has the ability to refill itself.
The food dispenser started as a commercial unit. To get feedback from the system he added a couple of magnets to the agitation motor and reads them with a hall effect sensor. In addition to an IP camera that monitors the area around the feeder (so [Enrico] can actually see his dog eating) there is a webcam which monitors the STM32 Discovery board which monitors the feeder. It tracks the number of times the dispenser has run.

Filed under: home hacks

Getting an Arduino to control a wireless outlet

Getting an Arduino to control a wireless outlet:
arduino-433-mhz-outlet-control
[Reza's] methodical investigation of this remote controlled outlet let him patch in with an Arduino using a 433 MHz transmitter. This is a single-device unit, but the techniques used here should allow you to take control of wireless rigs that have multiple modules to control many devices.
We’ve seen some folks at our local hackerspace try to patch into the remote control itself. That used some type of weird button scanning (not just connecting a pin to ground or voltage) and didn’t pan out. [Reza] doesn’t even crack open the case of either of the units seen above. Instead, he goes straight for a wireless receiver he had on hand, using a logic analyzer to capture the signals coming from the remote.
Once he had a good snapshot of the signals sent when pressing the on or off button of the remote he set out to replicate it in his Arduino code. His function called setStateWithDelay takes three parameters: the transmit pin, the level (high or low), and a number of milliseconds to delay. Each signal calls this function many times, but working the bugs out is pretty easy; just capture the signal with the logic sniffer and compare to the stock remote.

Filed under: arduino hacks

Building a linear motor

Building a linear motor:
linear-motor
We admit that this project doesn’t have very many details available, but it was just too neat for us to pass up. It’s a small linear motor which [ligonapProduktion] built after seeing a very brief description of a commercially available version.
The video after the break shows him testing the motor. In this screenshot he’s holding the center shaft while the coil assembly moves back and forth. But it works with a stationary coil moving the rod as well. The motor is basically a modified solenoid. There are sixteen neodymium magnets inside the shaft. The set of four coils is driven by an ATtiny44. Just like a stepper motor, energizing the coils in the correct order pushes against the rare earth magnets creating motion.
We’re not sure if he has any use in mind for this build. For us we just like to see the concept in practice (we feel the same way about a homopolar motor build).


[via Reddit]

Filed under: classic hacks

Feb 6, 2013

10 Συμβουλές για να Αποτύχει το Website σας

10 Συμβουλές για να Αποτύχει το Website σας:
website-sm.jpgΟι μισοί άνθρωποι κυνηγούν την επιτυχία και οι άλλοι μισοί τους δίνουν συμβουλές για να επιτύχουν. Εμείς, ως ξεχωριστά όντα, είπαμε να διαφοροποιηθούμε από όλους αυτούς. Αφού ψάξαμε, διαβάσαμε και είδαμε τα χειρότερα, αποφασίσαμε να μοιραστούμε μαζί σας τις εμπειρίες μας και να σας βοηθήσουμε να φτιάξετε ένα απόλυτα αποτυχημένο Web Site.
Τώρα αν εσείς για οποιοδήποτε λόγο επιμένετε στην επιτυχία, απλώς αποφύγετε πάση θυσία όσα ακολουθούν.
1) Ονομάστε το Site σας με κάποιο άσχετο όνομα.
Φαντάζεστε την έκπληξη που θα αισθανθούν οι επισκέπτες του http://www.poetry.gr αν ανακαλύψουν ότι πρόκειται για το Site ενός κρεοπωλείου; (Μην ψάξετε. Δεν υπάρχει τέτοιο site. Δεν θίγουμε υπολήψεις εμείς.)
Τώρα βέβαια, αν το πλασάρετε σωστά, ίσως και να κάνει τέτοια εντύπωση που να σας θυμούνται περισσότεροι και ευκολότερα. Άβυσσος η ψυχή του χρήστη!
2) Χρησιμοποιήστε ένα τεράστιο και ακαταλαβίστικο URL.
Πώς θα σας φαινόταν κάτι σαν το http://www.121~110+jhe987654sfd=-50g-0sfj.com; Σας εγγυόμαστε ότι κανείς δεν θα το θυμηθεί (ούτε καν ο φίλος σας που διαθέτει φωτογραφική μνήμη) αλλά και ούτε κανείς θα μπει στον κόπο να το αποθηκεύσει, πόσο μάλλον να το πει και σε άλλους; Μπορείτε τότε να είστε ήσυχοι. Δεν θα σας επισκεφθεί κανείς.
3) Φορτώστε τις σελίδες σας με όσες περισσότερες φωτογραφίες και άσχετα animations μπορείτε.
Για να έχετε τα επιθυμητά αποτελέσματα, απαιτούνται το λιγότερο 15 φωτογραφίες σε κάθε σελίδα (εννοείται τουλάχιστον 5MB η κάθε μία) και άλλα τόσα animations. Ε, με μια κανονική προς αργή ελληνική σύνδεση, θα χρειάζεται τουλάχιστον 1 ώρα για να κατέβει η σελίδα. Λίγο είναι;
Στην εξαιρετικά απίθανη περίπτωση που βρεθεί άνθρωπος που θα περιμένει να φορτώσει η σελίδα σας, τα παρακάτω ενδέχεται να συμβαίνουν:

- Πρόκειται για κάποιον δύσμοιρο που βρίσκεται φυλακισμένος σε ένα δωμάτιο όπου το μόνο που του επιτρέπεται να κάνει είναι να σερφάρει στο Internet ΚΑΙ (προσέξτε το), έχετε το μοναδικό Web Site στον κόσμο.
- Έχει λόγους να θέλει να μάθει σε ποιο σημείο εξαντλείται η υπομονή του.
- Του είπανε ότι «το καλό πράγμα αργεί να γίνει» και έτσι περιμένει με υπομονή. Δεν ήξερε. Δεν ρώταγε;
- Είναι απασχολημένος με κάτι άλλο και ξέχασε τον υπολογιστή αναμμένο. Κάτι σαν αυτούς που έχουν μηχανάκια της AGB.
?????? Είπαμε. Άβυσσος η ψυχή του χρήστη.
4) Μην ανανεώστε τις πληροφορίες στην ιστοσελίδα σας, πριν περάσουν τουλάχιστον 2 χρόνια.
Ποιος σας είπε ότι ο χρήστης επιθυμεί να μαθαίνει συνεχώς κάτι νέο από σας; Δώστε του το χρόνο να εμπεδώσει όλα τα παλιά σας νέα και ταυτόχρονα να επισκεφθεί όλα τα υπόλοιπα Sites του Web. Επανεξετάζοντας το θέμα, μήπως να περιμένατε 5 χρόνια; Είναι λίγο μεγάλο το Web. Ε, τώρα αν μετά από 5 χρόνια εξακολουθεί να σας επισκέπτεται για να μάθει νέα σας, η επιστήμη σηκώνει τα χέρια ψηλά.

5) Αφήστε το Web Site σας «Υπό Κατασκευή» για πολύ καιρό.
Κατανοούμε την εύλογη απορία σας.. «για πόσο καιρό;». Ως γνωστόν, ο χρόνος είναι σχετικός. (Και χρήμα, αλλά δεν μας ενδιαφέρει εδώ.) Στη γη, που ο χρόνος κυλάει γρήγορα, θα σας απαντούσα ένα χρόνο. Στο διάστημα, που κυλά πιο αργά, θα σας έλεγα τρία. Στον κυβερνοχώρο, φτάνει ένα τρίμηνο· όχι για να μην σας επισκεφθούν ποτέ (όποτε και αν κατασκευαστεί το site) αλλά για να χάσετε τους περισσότερους πελάτες σας.

Για πιο σίγουρα αποτελέσματα, αυτούς τους τρεις μήνες διαφημίστε το νέο σας (ανύπαρκτο) Site ΠΑΝΤΟΥ. Επιβάλλεται να είναι έκδηλος ο ενθουσιασμός σας για το νέο σας δημιούργημα, και η διαφήμιση να προδιαθέτει τον επισκέπτη για κάτι το εξαιρετικά ενδιαφέρον, πρωτοποριακό και χρήσιμο.

Καλού, κακού, αυτές τις μέρες, μη σηκώνετε τηλέφωνα.

6) Μπερδέψτε τους επισκέπτες.
Κατ αρχήν, οι τίτλοι των ενοτήτων που περιλαμβάνει το Site σας, δεν πρέπει να αποκαλύπτουν το παραμικρό για το περιεχόμενό αυτών. Με ποιο δικαίωμα στερείτε το σασπένς από το χρήστη; Αιφνιδιάστε τον. Σκοπός σας είναι να μην του επιτρέψετε να βρει αυτό που θέλει εκτός κι αν ψάξει σε όλο το Site. Γιατί να χάσει την ευκαιρία να μάθει πράγματα που ούτε ήθελε ούτε σκόπευε ποτέ να μάθει;

7) Αναπτύξτε σε βάθος τις απόψεις σας.
Χρησιμοποιείστε όσο μεγαλύτερα κείμενα μπορείτε και μάλιστα στην ίδια σελίδα. Γιατί να αναγκάζετε τον κόσμο να αλλάζει συνεχώς σελίδες; Έτσι κι αλλιώς αυτά που λέτε είναι τόσο ενδιαφέροντα που δεν θα μπορέσει να σταματήσει πριν μάθει τα πάντα. Αν βρεθεί κανείς να το διαβάσει ολόκληρο (λέμε τώρα), δεν υπάρχει η παραμικρή πιθανότητα να σας ξαναενοχλήσει. Στην καλύτερη περίπτωση θα βάλει σκοπό της ζωής του να προφυλάξει άλλους ανυποψίαστους χρήστες προειδοποιώντας τους να μείνουν μακριά σας.

8) Μην απαντάτε στα e-mail που λαμβάνετε.
Εάν έχετε κάνει κάποια από τα παραπάνω και όμως εξακολουθείτε να λαμβάνετε e-mail (εξαιρούνται οι περιπτώσεις αγανακτισμένων που διαμαρτύρονται), τότε προς Θεού μην τους δώσετε καμία σημασία. Συνιστάται να μην τα διαβάσετε καν. Πάντως ό,τι κι αν κάνετε, μην απαντήσετε. Αν καταλάβουν ότι ασχολείστε μαζί τους, δεν θα μπορείτε να απαλλαγείτε από την παρουσία τους.

Το καλύτερο δε που μπορείτε να κάνετε είναι να δίνετε μια ανενεργή ηλεκτρονική διεύθυνση. Όχι τίποτα άλλο, αλλά ποιος θα κάθεται να τα σβήνει. Όσο γι’ αυτούς που θα έχουν το θράσος (την τόλμη, την αφέλεια) να επιδιώξουν να επικοινωνήσουν μαζί σας, θα λάβουν το μήνυμα ότι αυτό είναι αδύνατον.

9) Γράψτε τα πάντα στα κινέζικα.
Βέβαια αν απευθύνεστε σε Κινέζους ή ανθρώπους που τυχαίνει να ομιλούν την κινεζική, τότε υπάρχει πρόβλημα. Μήπως τα Ιερογλυφικά, η Γραμμική Β΄ τα Ιδεογράμματα ή κάποια νεκρή γλώσσα να αποτελούν την καλύτερη επιλογή; Ίσως αν λέγατε τα πάντα με εικόνες (1 εικόνα ισοδυναμεί με 1000 λέξεις) και δη αφηρημένης τέχνης; Όχι, αυτό δεν το έχουμε συναντήσει (ακόμα) πουθενά στο web, αλλά δεν είναι απαραίτητο να μιμηθείτε τους άλλους. Να είστε δημιουργικοί. Εμείς κάνουμε την αρχή.

10) Κάντε όλα τα παραπάνω….
… και ό,τι άλλο σας φωτίσει ο Θεός. Μην αφήσετε κανέναν να σας ξεφύγει. Είστε αποφασισμένοι να αποτύχετε και δεν πρέπει να διστάσετε μπροστά σε τίποτα. Οι θερμότερες ευχές μας σας συνοδεύουν.

Δεν πωλείται

Δεν πωλείται:
-Μα αν πουλήσουμε όλες τις κρατικές εταιρίες, τι θα παραμείνει κρατικό;

-Το Mega!

(source: http://pitsirikos.net)

    GSM Modem με εισόδους και εξόδους από την Phoenix Contact

    GSM Modem με εισόδους και εξόδους από την Phoenix Contact:
    Αν ψάχνετε για ένα GSM Modem για τον απομακρυσμένο έλεγχο του αυτοματισμού σας μέσω κινητού τηλεφώνου, τότε σας προτείνουμε αυτό της PHOENIX CONTACT. Πρόκειται για ένα GSM Modem με ενσωματωμένους 6 εισόδους και 4 εξόδους όπου μπορείτε να τους προγραμματίσετε από τον υπολογιστή σας μέσω καλωδίου και της θύρας RS-232.

    Διατίθεται σε δυο εκδόσεις, η πρώτη με τάση τροφοδοσίας από 110V έως 240V AC διαθέτει 6 ψηφιακές εισόδους και 4 εξόδους ρελέ και η δεύτερη με τάση τροφοδοσίας 24V DC διαθέτει 6 ψηφιακές ή αναλογικές εισόδους και 4 εξόδους ρελέ.


    Ο απομακρυσμένος έλεγχος του GSM Modem γίνετε από τα κινητά τηλέφωνα που έχετε ορίσει εσείς και μέσω προκαθορισμένων μηνυμάτων SMS. Γράφοντας και στέλνοντας ένα SMS στην συσκευή μπορείτε να ενεργοποιήσετε ή απενεργοποιήσετε τις εξόδους της, ενώ σε κάθε αλλαγή της κατάστασης των εισόδων η συσκευή σας στέλνει ένα SMS στο τηλέφωνο σας. Μπορείτε επίσης στέλνοντας ένα SMS στην συσκευή, να έχετε την πλήρη απομακρυσμένη επιτήρηση όλων των εισόδων και εξόδων της.


    Η συσκευή δεν περιλαμβάνει κάρτα SIM στην συσκευασία της και θα πρέπει επιλέξετε μια εσείς. Δέχεται κάρτες SIM για δίκτυα των 850MHz, 900MHz, 1800MHz και 1900MHz.


    Το λογισμικό προγραμματισμού της συσκευής από τον υπολογιστή σας, διατίθεται δωρεάν και είναι πολύ φιλικό προς την χρήση, χωρίς να απαιτούνται ειδικές γνώσεις προγραμματισμού.


    Για περισσότερες πληροφορίες κατεβάστε το εγχειρίδιο χρήσης της συσκευής κάνοντας κλίκ ΕΔΩ.

    Paperduino Pi

    Paperduino Pi:


    This is a project for people a little bit skilled in soldering and design PCB. The user [dernulleffekt] designed an homemade shield for Raspberry Pi that integrate an Arduino Board.
    The Paper-Duino-Pi is an Arduino shield for the Raspberry Pi. Due to the fact that it is designed as Paper-PCB it is easy to create and one doesn’t need a printed circuit board. Some small modificaten in the OS and IDE and you have a perfect interface for the Raspberry Pi.
    This [video] shows how one can use it with the Firmata and Pure Data. On the [website] there is a very well written tutorial to build your Raspberry/Arduino shield at home.

    Enabling F-bus communications with Arduino

    Enabling F-bus communications with Arduino:
    It’s always nice to see how creative makers approach communication issues in DIY projects, and today we would like to highlight the approach followed by Alex, from InsideGadgets.
    On his website, he provides a detailed tutorial on how to use an old Nokia 6110 (or any derivatives) to send SMS messages by exploiting the Nokia’s F-bus, a simple bi-directional and full-duplex serial protocol.
    After considerable reverse engineering work, made possible by useful online documentation, Alex finally managed to send a SMS from his Arduino board, connected to the phone, thanks to AVR libraries made available by AVRFreaks.
    More information can be found on InsideGadget.
    [Via: Inside Gadgets]

    New design of Arduino GSM and GPS shield

    New design of Arduino GSM and GPS shield:
    Open-electronics have introduced new version of their Arduino GSM shield. The new shield uses well known GSM/GPRS module SIM900 and SIM908 GPS module what makes it versatile for voice and data communications.
    The new module has better power supply solutions and offers more customizations and configurations. All you need is to attach microphone and headphones in order to make phone-calls with Arduino. As usually there are libraries available for running your applications in shortest time possible. Couple Arduino sketch examples will make this happen even faster.

    Many reasons not to use Arduino in your next project

    Many reasons not to use Arduino in your next project:
    Actually the idea of Arduino is great. It’s a gold mine for novices to get simple and middleweight projects to get working in a short time. But all fun ends when critical timing kicks in. Probably this is why there are lots of attempts to mimic Arduino with high performance microcontrollers like PIC32 based ChipKIT or ARM based Netduino. These alternatives may save you in most cases by turbocharging performance but eventually you will end up wasting resources for hidden unknown and then you’ll be forced to dig deeper in to microcontroller hardware.
    Vassilis gives a nice lists that demotivates choosing Arduino for more advanced projects. Instead he suggests focus on pure programming using tools like AVR-GCC with no hidden libraries and functions. He points many reasons like Arduino IDE which is worst IDE for writing and editing code, fixed Arduino clock speeds, mandatory bootloader which occupies program space. Also simple operations like digital write takes to many clock cycles. Some background code is still running even if you’re not using it. As a proof try to compile empty Arduino program and you’ll see that it takes at least 466 bytes for doing nothing. By no means we are not discouraging using Arduino. As in all areas choose smart. And learning microcontroller architecture instead of blind relying on libraries is always a win!

    Wake your computer with Wake On Lan using Arduino

    Wake your computer with Wake On Lan using Arduino:
    Computers have a nice feature allowing powering PC by sending a command to LAN card. Just to make sure if it’s there go to your PC BIOS and find Wake On LAN (WOL) menu which you can enable. Once PC is ready next logical step is sending WOL command to make it work. Lucadentella have used Arduino with Ethernet shield to send this command.
    With proper libraries it’s just few lines of code, because WOL command is simple. You need to send FF:FF:FF:FF:FF:FF  address which is called broadcast MAC, then follows PC’s MAC repeated 16 times. If everything is fine tuned you should see PC powering on. Where this can be used? I see many benefits – as Arduino can accept any sensor information why not hook it to motion sensor and let PC turn on when you come home. I’m sure you can think of much more interesting ways of using it.

    Arduino as AM transmitter

    Arduino as AM transmitter:
    Markus have been experimenting with Arduino and AM signals. He managed to generate AM modulated radio signal by driving timer in PWM mode. Audio signal was taken with Arduino DAC.
    Circuit seems to be really simple – modulator part is only made of three components: decoupling cap, antenna and inductor. Transmitter with current configuration is tuned to 734kHz. How it sounds you can see in following video:
    [via:Dangerous Prototypes]

    Sending Arduino data to Google Docs spreadsheet

    Sending Arduino data to Google Docs spreadsheet:
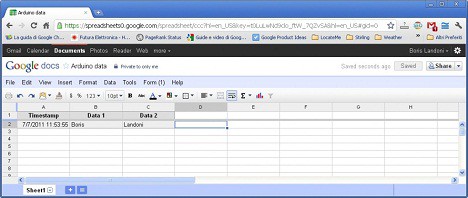
    With Arduino shields and libraries it is really easy to connect device to internet. Probably many of you have already tried Pachube service for publishing data online. The downside of Pachube that it is fairly hard to extract data from it to spreadsheet that could be analyzed in our way.
    Boris have shared his method of sending data from Arduino to Google Docs spreadsheet. The idea to access spreadsheet is to use Form from Google Docs which boxes are associated with spreadsheet fields. Then by using simple POST routine you can collect nicely arranged data table is spreadsheet which can be for your own needs.