Αναζήτηση

Powered By Blogger

Apr 7, 2013

Sneak Peek at the Make: Labs DIY Turbojet Engine Project

Sneak Peek at the Make: Labs DIY Turbojet Engine Project: jetengineWell here it is, Make:Labs first rendition of a homemade turbojet engine! The first two clips are an attempt to get it started but we ended up flooding it (which resulted in a very impressive flame-out). The third clip is our very first successful start-up and self-sustained run. This development [...]
Read the full article on MAKE

Bluetooth headset garage door opener update

Bluetooth headset garage door opener update:
bluetooth-headset-garagedoor-opener-update
[Lou Prado] sent in a link to his new video on using a Bluetooth headset as a garage door opener for your Android device. This isn’t a new hack, and we’ve actually seen him pull it off once before back in 2011. But we’re running this as an update for a couple of reasons. First off, we had forgotten about the hack and it’s worth revisiting. Secondly, the headset which he used with the initial hack has gone out of production. He chose a new model, and the assembly video (embedded after the break) which he made is a treasure trove of best practices to use when hacking consumer electronics.
Here’s how the hardware part of the hack goes. He removes the speaker from the headset and solders the base of a transistor in-line with a resistor to the red wire. The emitter connects to the grounded frame of the USB charging cable which is plugged into an outlet next to your garage door opener. The collector of the transistor is then connected to the garage door opener, along with a common ground connection, allowing audio from the headset to trigger the transistor to open the door.
The systems is secure based on Bluetooth pairing, which was done with his phone before starting the hardware hack.


Filed under: android hacks, home hacks

Adding Bluetooth remote control to PC speakers

Adding Bluetooth remote control to PC speakers:
adding-bluetooth-remote-control-to-pc-speakers
[Andrzej's] plain old computer speakers are ordinary no more. He pulled off a fairly complicated hack which now lets him control speakers via Bluetooth.
He had a set of Creative brand computer speakers with a volume potentiometer that needed replacing. He was having trouble finding a drop-in replacement part and decided he would just go with a rotary encoder. Obviously you can’t just drop one of those in, he would need a microcontroller to monitor the encoder and translate the change into the appropriate resistance. He figured if he was going this far he might as well make the most out of the uC.
Above you can see all the stuff he crammed into the original case. The rotary encoder is seen on the lower left. An ATmega8 is on a PCB he made himself. The white part to the left is a digital potentiometer which feeds the resistance to the original speaker PCB. On the left is the Bluetooth module which lets him control everything from his phone. You can see a demo of that after the break.


Filed under: digital audio hacks, Microcontrollers

AVR VGA generator

AVR VGA generator:
avr-vga-generator
This simple circuitry makes up the hardware for [Andrew's] AVR-based VGA generator. He managed to get an ATmega1284 to output a stable VGA signal. Anyone who’s looked into the VGA standard will know that this is quite an accomplishment. That’s because VGA is all about timing, and that presented him with a problem almost immediately.
The chip is meant to run at a top speed of 20 MHz. [Andrew] did manage to get code written that implemented the horizontal and vertical sync at this speed. But there weren’t enough clock cycles left to deal with frame buffering. His solution was to overclock the chip to 25 MHz. We assume he chose that because he had a crystal on hand, because we think it would have been easier to use a 25.174 MHz crystal which is one of the speeds listed in the specification.
Red, green, and blue each get their own two-bit range selected via a set of resistors for a total of 64 colors. As you can see in the video after the break, the 128×96 pixel video is up and running. [Andrew] plans to enlarge the scope of the project from here to make it more versatile than just showing standard images. The code (written in assembly) is available at his GitHub repository.


Filed under: Microcontrollers, video hacks

Adding Bluetooth remote control to PC speakers

Adding Bluetooth remote control to PC speakers:
adding-bluetooth-remote-control-to-pc-speakers
[Andrzej's] plain old computer speakers are ordinary no more. He pulled off a fairly complicated hack which now lets him control speakers via Bluetooth.
He had a set of Creative brand computer speakers with a volume potentiometer that needed replacing. He was having trouble finding a drop-in replacement part and decided he would just go with a rotary encoder. Obviously you can’t just drop one of those in, he would need a microcontroller to monitor the encoder and translate the change into the appropriate resistance. He figured if he was going this far he might as well make the most out of the uC.
Above you can see all the stuff he crammed into the original case. The rotary encoder is seen on the lower left. An ATmega8 is on a PCB he made himself. The white part to the left is a digital potentiometer which feeds the resistance to the original speaker PCB. On the left is the Bluetooth module which lets him control everything from his phone. You can see a demo of that after the break.


Filed under: digital audio hacks, Microcontrollers

Embedded web server is all about clever formatting

Embedded web server is all about clever formatting:
embedded-web-server
Take a look around here and you’ll find all kinds of embedded web servers. This one doesn’t look all that interesting, especially because it’s just a NIC plugged into a development board. But for us the interesting part is in how [Andrew Rossignol] chose to format the webpage assets to best utilize the under-powered server.
The project was spawned as part of a class in Internet Embedded Systems which [Andrew] is taking. The board has an ATmega16 microcontroller and he’s using the ever popular ENC28J60 on that Ethernet adapter board. The TuxGraphics TCP/IP Stack takes care of communications with the network.
One constraint which [Andrew] imposed upon himself was to use just a single response which the available RAM limits to about  700 bytes. Any decent webpage needs to have at least some graphics but that’s tough with the size limit. He managed to display an AVR logo by optimizing an SVG in Inkscape then stripped the rest of the cruft using VIM (explained in the demo after the break). With that piece of Linux-fu in his pocket he set to work streamlining the CSS file. The webpage isn’t just static either. He displays the server up-time and even allows the relays and LEDs on the Olimex board to be controlled.
Despite the limitations of the ATmega family they still seem to do some amazing Internet-connected stuff. Here’s one used as a Minecraft server.


Filed under: Microcontrollers

Upgrading a router with impeccable soldering skills

Upgrading a router with impeccable soldering skills:
router
[Necromant] recently acquired a router that was nearly free. Looking his gift horse in the mouth, he hooked up a serial port to see if it could run some updated firmware such as OpenWRT. The initial findings were promising; it used the same CPU as the very popular WR703N, but this free router only had 2 MiB of Flash and 8 MiB of RAM – barely enough to do anything. His solution to this problem is in the true hacker tradition: just solder some more chips onto the router.
Upgrading the RAM was comparatively easy; [Necromant] found an old stick of RAM, desoldered one of the chips, and replaced the measly 8 MiB chip with a new 64 Megabyte chip.
The Flash, though, proved more difficult. Without the right code in the Flash for the radio test, the router wouldn’t be useful at all. The solution was to read the original 2 MiB chip, read the Flash from a  WR703, and combined the two with a simple dd command. This was written to a new SPI flash chip with a buspirate and a home etched board.

Filed under: hardware, wireless hacks

Adding an optical mouse sensor to an autonomous vehicle

Adding an optical mouse sensor to an autonomous vehicle:
optical-mouse-sensor-for-autonomous-vehicle
[Tim] is getting his drone ready for SparkFun’s 2013 Autonomous Vehicle Competition on June 8th. He has a pretty good start, but was having some problems accurately measuring travel distance. The technique he chose for the task was to glue magnets onto the axles of the vehicle and monitor them with a hall effect sensor. Those sensors are finicky and a few problems during testing prompted him to look at a redundant system. Right now he’s experimenting with adding an optical mouse sensor to the autonomous vehicle.
Recently we saw the same concept used, but it was meant for tracking movement of a full-sized automobile. If it can work in that application it should be perfect here since the vehicle is much closer to the ground and will be used in ideal conditions (flat pavement with clear weather). [Tim] cracked open an old HP mouse he had lying around. Inside he found an Avago ADNS-5020 sensor. After grabbing the datasheet he discovered that it’s simply an I2C device. Above you can see the Arduino Leonardo he used for the first tests.
[Tim] coded functions to monitor the chip, including some interesting ones like measuring how in-focus the surface below the sensor is. This brings up a question, is there limit on how fast the vehicle can travel before the sensor fails to report back accurately?

Filed under: robots hacks

Wireless Temperature Control for a Microbrewery

Wireless Temperature Control for a Microbrewery:
Wireless Temperature Control
When brewing your own beer, temperature control is important. If the temperature isn’t regulated correctly, the yeast will be killed when it’s added to the wort. It’s best to cool the wort from boiling down to about 25 C quickly before adding yeast.
To do this, [Kalle] came up with a wireless temperature controller for his home brewing setup. The device uses a heat exchanger to cool the wort. An ATmega88 connected to a H-bridge controls a valve that regulates flow through the heat exchanger. It reads the current temperature from a LM35 temperature sensor and actuates the valve to bring the wort to a set point.
A neat addition to the build is a wireless radio. The nRF24L01 module provides a wireless link to a computer. There’s an Android application which communicates with the computer, providing monitoring of the temperatures and control over the set point from anywhere [Kalle] can get an internet connection.

Filed under: beer hacks

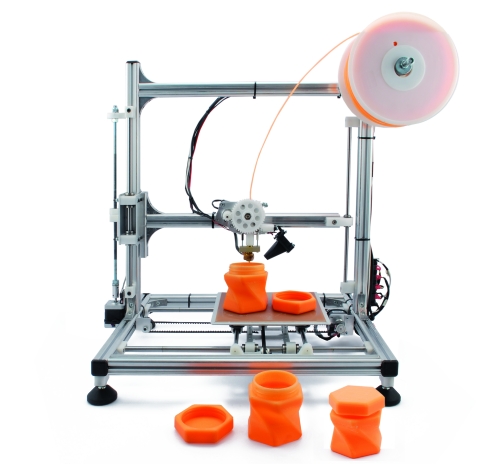
3Drag: the Open Electronics way to RepRap

3Drag: the Open Electronics way to RepRap:

Few months ago, after long months of testing, assembling and disassembling, print trials,and countless sleepless nights we finally decided to give birth our interpretation of the RepRap project.
3D Printer4
First steps
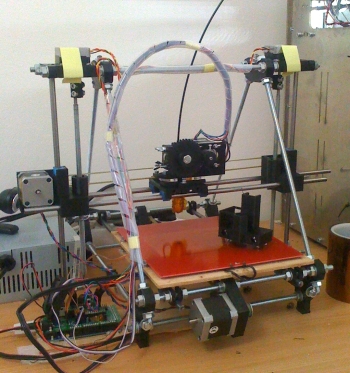
Assembled-prusa-mendelWhen we picked up the first RepRap kit, an elaboration of a Mendel, we spent the first couple of days to navigate between videos, screws, threaded rods and bolts: it wasn’t difficult, but surely the assembly was not so obvious and linear.
While the Prusa Mendel, the reference model and most “popular” RepRap version, can count on a myriad of mechanical parts, accessories and modifications that can be used from scratch, other RepRaps – with variations and changes in the structure – always require an assessment of the applicability of this or that changes you find online.
In light of our experience, we started planning our version of Mendel with three simple goals: ease of installation, Prusa Mendel comparable performance, 100% compatibility with RepRap electronics, firmware and software.

After two months, the light
3D Printer1
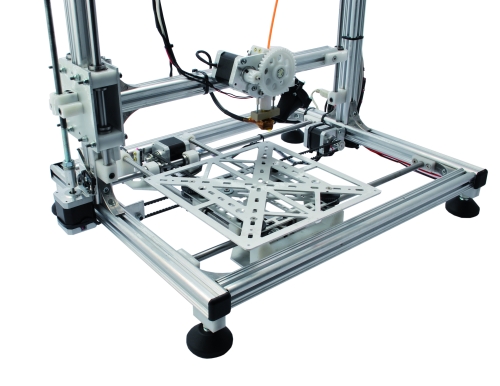
Pursuing simplicity of assembly led us to abandon molded plastic parts and M8 threaded rods and switch to aluminum profiles with shapes designed with fixing parts in mind.
In exchange for this very stable structure that you can assemble with simple sequences, our printer is not “compatible” with the world of RepRap mechanical tweaks. Each part is designed to be light where needed, such as with the plate drive system, and rigid to suppress vibrations and unwanted resonances.
Compared to a Mendel, our printer uses the X/Y the plate and Z for the dolly. This allowed us to simplify the extrusion system that no longer have to move on a horizontal axis: is simply attached to the structure that moves along the Z axis.
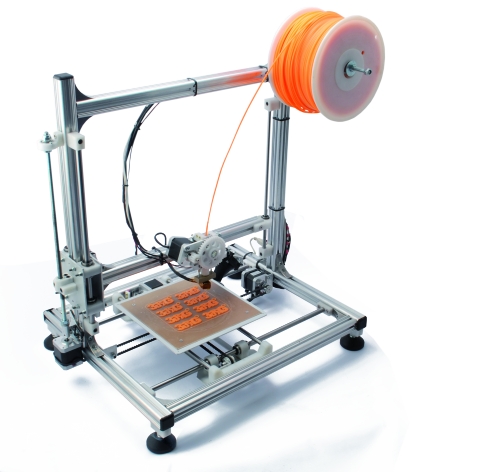
The printing plate support, then, is designed to accommodate a “base” of epoxy glass that combines good adhesion with the PLA, dimensional stability and it’s quite cheap. The surface of the epoxy glass base must be treated with fine sandpaper to expose the fiberglass. From our trials you get a smooth matte finish along with an excellent grip, even with pieces of a certain size. Compared with many other solutions we tested during experimentation, this is proving to be the most interesting solution with PLA prints. The dimensions of the support, however, are suitable for mounting of a Prusa floor heating standard solution (about 21 x 21 cm) on which you can set a printing plate provided that this is not too heavy. One of the first prints made ​​with our printer, it is worth to mention, is the half Eiffel Tower that was carried out at approximately 85 mm per second with a vertical height of about 20 centimeters. The result has left us amazed at first, because from an initial setting of a 60(120) mm/sec in printing(moving), we realized we’d left a speed increase of 140% on Repetier-Host. Nevertheless, the entire structure was almost perfect, with fine detail and precision in elements positioning. The image of the molded part is still more than a thousand words.

Finally kit are available.
3D Printer2
With the results achieved, and after few more months of refinements, we can finally release our mechanical interpretation of a RepRap we think of ourselves not exempt from offering everything in a practical and complete kits.
As said, electronics are fully compatible with the firmware and software from RepRap world. This will allow you to upgrade your printer with the new firmware and software solutions that gradually people will be able to create to make 3D printing easier and more intuitive.
The Marlin firmware is provided configured to reflect: the mechanical characteristics of the belts, the position and the direction of rotation of the motors and the connection type of the of Home (0,0,0) positions detection microswitches. Using a 0022 or 0023 Arduino IDE you can reprogram the board with all the simplicity of a single click of the mouse.
Marlin, moreover, can be reconfigured in a simple manner by intervening in the source file “Configuration.h” which contains all the functional parameters and mechanics characteristics. To make the printing and adjustment simpler and more repeatable we have combined the microswitch a series of screws which allow fine adjustment of each zero position. This is not an automatic adjustment, but once you have adjusted the screws in the correct way, you will have a steady and reliable positioning.

Apr 4, 2013

Well optimized web server under AVR

Well optimized web server under AVR:
ATmega16 microcontroller is limited by RAM which is 1K. For a decent embedded webserver this is very little. But it seems to be possible as Andrew project shows. As part of his taken course on Internet Embedded Systems he decided to muck around and build a small web server with some smart ass features. His setup consists of Atmega16 development board with relays and ENC28J60 based Ethernet controller. First of all he squeezed his server response in to 700 bytes.
With this chunk of data he was able to display optimized AVR logo image, HTML, JavaScript and CSS. In webpage there is uptime counter which updates dynamically. Also there is total HTTP requests counter and lastly relay control. He plans this initial template to use in to his next project where he could control fume extract system from webpage. Not bad for old school Atmega16.

Apr 1, 2013

Wireless Arduino mail checker

Wireless Arduino mail checker:
Have you caught yourself checking mailbox several times before mailman comes? I don’t call this a problem, but when mailbox is out of sight it takes your time. So Robert decided to modernizer mailbox so it would send notification once mail arrives. In his mail box he added moteino – custom wireless Arduino which simply reads hall sensor. When mailman puts something in the box, he opens it and thus magnet activates the sensor.
Moteino message can be processed in many ways. For instance computer running python script can simply send email or SMS notification. Since Moteino is battery powered a special care is taken to save energy. There is a transistor key used to control power for hall sensor. Device is kept most time in sleep and woken every 250ms averaging power consumption of about 60uA. This is cool way to convert snail mail in to email, isn’t it?

Mar 29, 2013

Shrunk down an Arduino to the size of a finger-tip!

Shrunk down an Arduino to the size of a finger-tip!:
6b4d61f874ac45f6694b729538b2028f_large
RFduino: A finger-tip sized, Arduino compatible, wireless enabled microcontroller, low cost enough to leave in all of your projects!
The RFduino runs Arduino code and can do everything an Arduino can, plus much more. Using the RFduino USB shield, simply plug the RFduino into a USB port of any computer and use the Arduino IDE to load your Arduino sketch, which automatically begins running on the RFduino.Then you can detach the RFduino USB shield and plug the RFduino directly into your project.
Shrunk down an Arduino to the size of a finger-tip! - [Link]

Mar 26, 2013

Enhance your device with ethernet while you wait and now also for free!

Enhance your device with ethernet while you wait and now also for free!:
obr1250_1
For ten of you, we prepared samples of the Lantronix xDirect module. It is a complete solution of Ethernet connectivity of a serial device to LAN – directly, without intervention to a device. 
The new module – serial / LAN communication interface incorporated into a cable, brings the most simple possible solution how to connect any device with a serial interface with a DB9 connector (RS232, RS422, RS485) into a LAN and use all advantages of a remote access, data acquisition etc.
xDirect can be powered through a DB9 connector, miniUSB-B connector or also via (Power over ethernet). Similarly like Lantronix xPort, even xDirect contains a built-in web-server enabling access and configuration of a device via a standard web browser on a PC, smartphone or a tablet tablet.
xDirect is available in 3 versions:
XDT2321002-01-S with the RS232 interface and a power supply adaptor (through a mini USB-B connector)
XDT4851002-01-S with the RS232/422/485 interface and a power supply adapter
● XDT10P0-01-S with the RS232/422/485 interface and the possibility to be powered via PoE (supplied without a power supply adaptor).
Detailed information will provide you the xDirect flyer, xDirect Quick start and xDirect user guide. In case of interest, please contact us at info@soselectronic.com.

Enhance your device with ethernet while you wait and now also for free! – [Link]
Mar 16, 2013

Plop: Εκκινήστε διανομές με usb stick από pc που δεν το υποστηρίζουν!

Plop: Εκκινήστε διανομές με usb stick από pc που δεν το υποστηρίζουν!: Εκκινήστε έναν υπολογιστή από usb stick, ακομα & αν δεν υποστηρίζει αυτή τη δυνατότητα& δοκιμάστε η εγκαταστήστε όποια Linux διανομή η άλλο λειτουργικό σύστημα θέλετε!
The post Plop:...


--------------------------------------------------------------