Homemade Mini Dremel Tool:
Hello!This is my first instructable... hope to like it :)I wanted to buy dremel tools but they are very expensive, so I decided to make it myself, mixing ideas from more sites, images, yt videos etc.The good side of my instructable is that the dremel works, but unfortunately it has a bad side... It ...
By: bostroglav
Continue Reading »

Feb 27, 2016

DIY PVC Clamp
DIY PVC Clamp:
This was a feasibility study to see if I could make a low cost clamp out of PVC pipe. I made this one out of "200 psi" because it was what I had handy. I recently saw an I'ble by someone else making clamps by sawing it into bands and cutting slots in the bands. I cannot find his post, so I can...
By: graydog111
Continue Reading »
This was a feasibility study to see if I could make a low cost clamp out of PVC pipe. I made this one out of "200 psi" because it was what I had handy. I recently saw an I'ble by someone else making clamps by sawing it into bands and cutting slots in the bands. I cannot find his post, so I can...

By: graydog111
Continue Reading »
Feb 18, 2016
ESP8266 client-server based wireless weather station
ESP8266 client-server based wireless weather station:
If you ever tried to build weather station, you probably know that wired solution sucks. For something more serious always go with wireless – this way you are not limited by distance and setup looks clean. Rui Santos have been working on wireless weather station where he implements server-client solution with two ESP8266 modules. Client module takes care of reading temperature from DS18B20 sensor and reads ADC value on one pin. Server side module receives data and transfers to PC using serial interface using FTDI adapter.
He used Things Gateway – software written by Roberto Valgolio. It allows reading and writing data from/to microcontroller using excel, csv, send emails and display charts. All you need is to configure Things Gateway to accepts serial data and point it to excel spreadsheet tabs. Once you have it working, you can start adding more sensors like barometric pressure, light, humidity, wind speed, rain and so on.
If you ever tried to build weather station, you probably know that wired solution sucks. For something more serious always go with wireless – this way you are not limited by distance and setup looks clean. Rui Santos have been working on wireless weather station where he implements server-client solution with two ESP8266 modules. Client module takes care of reading temperature from DS18B20 sensor and reads ADC value on one pin. Server side module receives data and transfers to PC using serial interface using FTDI adapter.

He used Things Gateway – software written by Roberto Valgolio. It allows reading and writing data from/to microcontroller using excel, csv, send emails and display charts. All you need is to configure Things Gateway to accepts serial data and point it to excel spreadsheet tabs. Once you have it working, you can start adding more sensors like barometric pressure, light, humidity, wind speed, rain and so on.
ESP8266 client-server based wireless weather station
ESP8266 client-server based wireless weather station:
If you ever tried to build weather station, you probably know that wired solution sucks. For something more serious always go with wireless – this way you are not limited by distance and setup looks clean. Rui Santos have been working on wireless weather station where he implements server-client solution with two ESP8266 modules. Client module takes care of reading temperature from DS18B20 sensor and reads ADC value on one pin. Server side module receives data and transfers to PC using serial interface using FTDI adapter.
He used Things Gateway – software written by Roberto Valgolio. It allows reading and writing data from/to microcontroller using excel, csv, send emails and display charts. All you need is to configure Things Gateway to accepts serial data and point it to excel spreadsheet tabs. Once you have it working, you can start adding more sensors like barometric pressure, light, humidity, wind speed, rain and so on.
If you ever tried to build weather station, you probably know that wired solution sucks. For something more serious always go with wireless – this way you are not limited by distance and setup looks clean. Rui Santos have been working on wireless weather station where he implements server-client solution with two ESP8266 modules. Client module takes care of reading temperature from DS18B20 sensor and reads ADC value on one pin. Server side module receives data and transfers to PC using serial interface using FTDI adapter.
He used Things Gateway – software written by Roberto Valgolio. It allows reading and writing data from/to microcontroller using excel, csv, send emails and display charts. All you need is to configure Things Gateway to accepts serial data and point it to excel spreadsheet tabs. Once you have it working, you can start adding more sensors like barometric pressure, light, humidity, wind speed, rain and so on.
Wireless energy monitor using ESP8266 module
Wireless energy monitor using ESP8266 module:
Most of us are concern about energy usage. This helps to reduce bills, have a little impact on saving planet and be conscious about things you never thought being important. For the right task you need right tools. Brian Dorey have been successful on building energy metering. His previous Raspberry Pi based solar data logger gave him enough experience to move on with new idea of mains energy meter. This time he decided to use ESP8266 wireless module to do the main load. It has enough processing power to deal with sensor data also there are plenty of Arduino based libraries to make development easier.
His energy meter was designed to do three measurements: mains current, mains electric usage and gas usage. All three data streams had to be gathered in three different ways. First of all mains current. He used iSnail current sensor which simply outputs 0-5V for 0-100A current range. All he had to do is to read sensor output voltage with ADS1115 16-bit ADC from Texas Instruments. The data could be read using I2C interface.
He used clever method to detect mains energy usage. It turned out that installed meter has an LED which blinks every single Wh is used. By capturing LED blink with phototransistor he was able to collect and accumulate the value.
Third thing he wanted to do is to measure gas usage. Since there is no electricity flow the measurements had to be done in different way. His gas usage meter uses mechanical wheel with small magnet. So he used reed switch to capture wheel turns and this way accumulate gas usage.
Brian used FRAM memory chip to store accumulated values in case of power cut. For this he used FM24CL04B 4Kb FRAM from Cypress which can also be accessed via I2C interface. The second part of his meter was to send data using wireless transmission. For this purpose he used expanded the functionality of his Raspberry data logger to accept XML formatted data which then could be fed in to web server. If this project looks interesting, all project files are available on Github.
Most of us are concern about energy usage. This helps to reduce bills, have a little impact on saving planet and be conscious about things you never thought being important. For the right task you need right tools. Brian Dorey have been successful on building energy metering. His previous Raspberry Pi based solar data logger gave him enough experience to move on with new idea of mains energy meter. This time he decided to use ESP8266 wireless module to do the main load. It has enough processing power to deal with sensor data also there are plenty of Arduino based libraries to make development easier.

His energy meter was designed to do three measurements: mains current, mains electric usage and gas usage. All three data streams had to be gathered in three different ways. First of all mains current. He used iSnail current sensor which simply outputs 0-5V for 0-100A current range. All he had to do is to read sensor output voltage with ADS1115 16-bit ADC from Texas Instruments. The data could be read using I2C interface.
He used clever method to detect mains energy usage. It turned out that installed meter has an LED which blinks every single Wh is used. By capturing LED blink with phototransistor he was able to collect and accumulate the value.
Third thing he wanted to do is to measure gas usage. Since there is no electricity flow the measurements had to be done in different way. His gas usage meter uses mechanical wheel with small magnet. So he used reed switch to capture wheel turns and this way accumulate gas usage.
Brian used FRAM memory chip to store accumulated values in case of power cut. For this he used FM24CL04B 4Kb FRAM from Cypress which can also be accessed via I2C interface. The second part of his meter was to send data using wireless transmission. For this purpose he used expanded the functionality of his Raspberry data logger to accept XML formatted data which then could be fed in to web server. If this project looks interesting, all project files are available on Github.
Feb 17, 2016
A 3D Printed Jet Engine Appears to Function
A 3D Printed Jet Engine Appears to Function:
[amazingdiyprojects] has been working on a 3D printable jet engine. You may remember seeing a 3D printed jet engine grace our front page back in October. That one was beautiful didn’t function. This one flips those values around. [amazingdiyprojects] seems to make a living from selling plans for his projects, so naturally most of the details of the build are hidden from us. But from what we can see in the video clips there are some really interesting solutions here.
Some of the parts appear to be hand-formed sheet metal. Others are vitamins like bearings and an electric starter. We really liked the starter mechanism, pressing in the motor to engage with a spline, or perhaps by friction, to give the starting rotation.
What really caught our attention was casting the hot parts of the printer in refractory cement using a 3D printed mold. It reminds us of the concrete lathes from World War 1. We wonder what other things could be built using this method? Flame nozzles for a foundry? A concrete tea-kettle. It’s pretty cool.
We’re interested to see how the jet engine performs and how others will improve on the concept. Video of it in action after the break.
UPDATE: [amazingdiyprojects] posted a video of the engine being disassembled.
UPDATE:
Feb 14, 2016
New ATEX-certified explosion-proof enclosures
New ATEX-certified explosion-proof enclosures:
 Bud Industries has introduced an ATEX certified enclosure for use in settings that may have explosive atmospheres caused by gases, vapors, mists or air/dust mixtures. Application environments include chemical and pharmaceutical processors, petrochemical sites, nutrients processors, wood and metal grinding operations, and other powder/dust operations.
Made of heavy-duty die-cast aluminum and sealed with a continuous silicon rubber gasket, the ATX Series enclosures are rated for explosive atmospheres such as grain dust and conductive dust (Zones 21, 22). It is certified to ATEX II 2 G Ex e IIC Gb and ATEX II 2 D Ex tb IIIC Db. Also it is UL listed and rated at IP66 per the IEC 60529 standard.
Ten sizes are available ranging from 2.95 x 3.15 x 2.24 to 14.17 x 6.30 x 3.54 inches.
The ATEX Series enclosure is suitable for harsh environments. The aluminum body is powder coated, and captive screws in the cover are made of stainless steel. It has a service temperature range of – 50 °C to +135 °C, allowing its use in a wide range of indoor and outdoor applications.
It comes with four copper-plated ground screws in the body for ground and plate assembly. Optional accessories include aluminum internal mounting plate and external mounting brackets.
Per ATEX requirements, these enclosures will maintain their rating only if they are modified by the factory in India. If the knowledge that the un-modified box passed the requirements is sufficient, then Bud’s industry-leading 5-day modifications program can be utilized. Bud provides custom modifications at no extra cost within five to six days … 2-3 times faster than most other enclosure suppliers.
Bud Industries
budind.com
The post New ATEX-certified explosion-proof enclosures appeared first on Design World.
An Arduino-Powered Laser Engraver That You Can Build
An Arduino-Powered Laser Engraver That You Can Build:


Source: An Arduino-Powered Laser Engraver That You Can Build
MichielD99 is a 16 year old Belgian teenage maker. It is amazing that, with the tools and materials available today, a young person, really any person, can create something as sophisticated and professional-looking as this laser engraver.You can see the complete plans for his build on this Instructables page. There he also includes a Bill of Materials with links to all of the parts available online and PDF and STL versions of all of the template files used to create his engraver.
To drive the machine, he used an Arduino UNO with two NEMA-17 stepper motors and stepper motor drivers he got from AliEXpress. By using AliExpress, he was able to keep the component costs down, with the entire thing costing about US$220. The laser is a 1.8W 445nm module.
Michiel designed the device in such a way that he can also install a Dremel tool as the head. This will allow him to turn it into a CNC router when he wants to.
Source: An Arduino-Powered Laser Engraver That You Can Build
Fish’n Tweets
Fish’n Tweets:
There are many possibilities for the remote control of electric appliances, each with own Pro and Cons.
Let’s see an incomplete list of them:
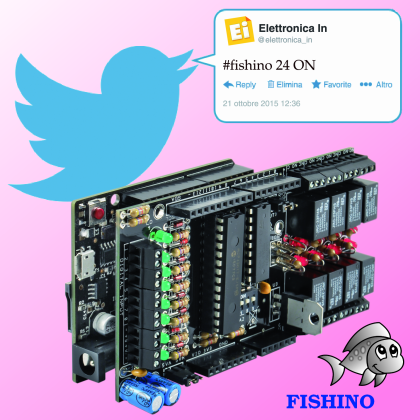
With this project we’ll show a practical application of our Fishino board that allows a very simple and cheap way to control remote appliances as lamps, heaters, climatizers, alarms, etc.
The peculiarity of our system is that it doesn’t need any external support server nor special network interface boards, but just a Fishino UNO board and possibly one or more relay boards to drive connected loads. This application which can’t be done with a simple Arduino, even not if provided with a common WiFi or Ethernet shield, has been made possible by Fishino’s capability to handle secure connections with HTTPS protocol, which is usually available on more expensive boards; to stay into Arduino world, now at least a YUN board is needed to achieve same purpose, and with a more complex software.There are many possibilities for the remote control of electric appliances, each with own Pro and Cons.

Let’s see an incomplete list of them:
- Control by SMS – Advantages:
- Receiver can be portable and independent of network infrastructures
- Fast – commands are executed almost instantly
- Can be controlled from any cell phone, even from older ones
- Practically unlimited rangeCaveats:
- A SIM card is needed on controlled board, which usually has an expiration time
- It needs a GSM board, not very cheap
- It needs GSM network coverage, not everywhere available
- Radio control – Advantages:
- Receiver can be portable and independent of network infrastructures
- Fast – commands are executed almost instantly
- Very chealCaveats:
- Very limited range
- Range depends on obstacles between sender and receiver
- Remote control over internet – Advantages:
- Can be made portabled at the price of a GPRS board
- Can be controlled by any PC or recent cell phone
- Quite cheap if you’ve a network infrastructure in place
- Can be made bidirectional with no costCaveats:
- A network infrasctructure or a GPRS board is needed, which can be expensive
- Stability depends on network conditions
- Response times can be very variable
- Often it needs complicated boards and/or support external PC
- Usually a public IP or a way to bypass this limitation is needed,
- Security problems are always possible
Tire Codes
Tire Codes:
Have you ever wondered what the meaning of numerous codes written on the sidewall of tires could be?
These codes are meant to help you buy the right tire. And also save your life!
Do you know that those codes contain information about the type of vehicle to be used with it, Car tire expiration date, size of rim, load and speed ratings? Using a wrong tire can cause fatal accident. Now these codes can really save your life.
Usually, a tire will have similar to P205/60R16 90H printed on its sidewall.
Tire Type
Tire Type The letter "P" at the beginning of the "Tire Size" tells us that the tire is a P-Metric tire, referring to tires made to certain standards within the United States, intended for Passenger vehicles.
If a tire size has no letters at the beginning, this indicates a Euro metric tire. Also note that P-Metric and Euro-Metric tires may have different load capacities.
The letters "LT," either at the beginning or at the end of the tire size indicate the tire was designed for light trucks. Vehicle manufacturers equip some light trucks with "LT" type tires. These tires generally require higher inflation pressures than passenger tires.
T on the other hand means Truck vehicles.
These codes are meant to help you buy the right tire. And also save your life!
Do you know that those codes contain information about the type of vehicle to be used with it, Car tire expiration date, size of rim, load and speed ratings? Using a wrong tire can cause fatal accident. Now these codes can really save your life.
Usually, a tire will have similar to P205/60R16 90H printed on its sidewall.

Tire Type
Tire Type The letter "P" at the beginning of the "Tire Size" tells us that the tire is a P-Metric tire, referring to tires made to certain standards within the United States, intended for Passenger vehicles.
If a tire size has no letters at the beginning, this indicates a Euro metric tire. Also note that P-Metric and Euro-Metric tires may have different load capacities.
The letters "LT," either at the beginning or at the end of the tire size indicate the tire was designed for light trucks. Vehicle manufacturers equip some light trucks with "LT" type tires. These tires generally require higher inflation pressures than passenger tires.
T on the other hand means Truck vehicles.
http://mechanicstips.blogspot.com/feeds/posts/default?alt=rss
Car Dashboard Symbols
Car Dashboard Symbols:
Have you ever wondered what the lights on your vehicle’s dashboard mean? Some are obvious, but others might have you flipping through the pages of your owner’s manual. To make things easier, we scoured the net to find this handy guide.
Dashboard lights commonly inform drivers about problems like poor battery condition, low oil pressure and high engine temperature. But many cars now have lights for service interval indicators and seatbelt reminders along with malfunctions ranging from faulty anti-skid stability control to blocked air and fuel filters, defective diesel filters or fuel contaminated by water.

Dashboard lights commonly inform drivers about problems like poor battery condition, low oil pressure and high engine temperature. But many cars now have lights for service interval indicators and seatbelt reminders along with malfunctions ranging from faulty anti-skid stability control to blocked air and fuel filters, defective diesel filters or fuel contaminated by water.
http://mechanicstips.blogspot.com/feeds/posts/default?alt=rss
Subscribe to:
Comments (Atom)